A single loose button can quietly ruin the look of an otherwise perfect coat — and knowing how to fix a loose button on a coat yourself means you never have to walk out the door looking less than your best. The good news? You don’t need to be a tailor or own a sewing machine. A needle, thread, and about ten minutes are enough to get the job done properly.
Why buttons come loose in the first place
Before jumping into the repair, it helps to understand what’s actually happening. Buttons loosen over time due to repeated stress on the thread — every time you button and unbutton your coat, the thread flexes. Coats in particular take more wear than most garments because of the weight of the fabric and the size of the buttons. Factory stitching is also often done quickly and with minimal thread anchoring, which means many buttons are loose from the start, just waiting for one cold morning to finish the job.
There’s also the matter of thread quality. Cheaper coats frequently use standard all-purpose thread, which breaks down faster than proper button thread or waxed thread. Once you re-sew a button yourself with better materials, it tends to stay put far longer than the original stitching did.
What you’ll need before you start
Getting your materials together takes less than two minutes, and having the right things on hand makes the whole process smoother.
- A hand-sewing needle (a slightly thicker one works better for coat fabric)
- Button thread or heavy-duty thread — ideally matching the color of the existing thread on the coat
- Small scissors or a seam ripper
- The loose button itself (or a replacement if it’s gone missing)
- A thimble, if you find it useful
- A toothpick or a matchstick (this becomes important in a moment)
One thing worth mentioning: if the button is completely gone and you need a replacement, check the inside seams of the coat first. Many manufacturers sew an extra button into the lining specifically for this purpose.
Step-by-step: reattaching the button the right way
The method below works for flat buttons with two or four holes, which covers the vast majority of coat buttons. The process for shank buttons (those with a loop on the back) is slightly different and is covered separately below.
Start by removing any remaining old thread from the button and the fabric. Even a few leftover strands can interfere with clean stitching, and old frayed thread can weaken your repair before it’s even done. Use the seam ripper or scissors to clear it away completely.
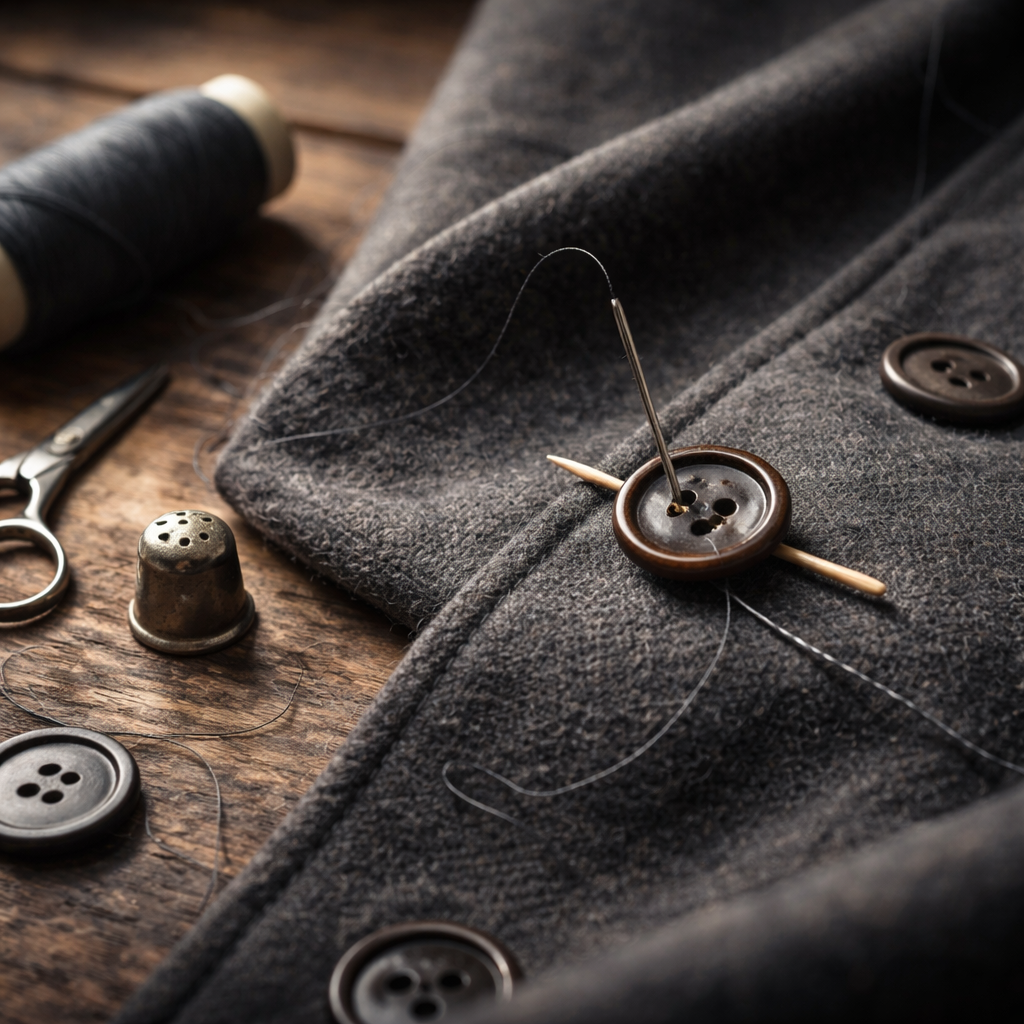
Cut a length of thread about 50–60 cm long and thread your needle, doubling the thread so you’re working with two strands together. Tie a knot at the end. This doubles the strength of each stitch without requiring you to go through the fabric more times.
Position the button on the fabric. Here’s the detail that separates a durable repair from one that loosens again in a week: place a toothpick or matchstick on top of the button, between the holes, before you begin stitching. Sew through the button holes and the fabric around it — passing the needle over the toothpick each time. Once you’ve done six to eight passes through each pair of holes, remove the toothpick. You’ll see that the thread has some slack above the button. Wrap the thread firmly around the threads beneath the button several times to create what’s called a shank — a small thread column between the button and the fabric. This shank is what allows the button to pass through the buttonhole without straining the attachment point.
Finally, push the needle through to the back of the fabric and make a few small locking stitches before cutting the thread. Pull gently on the button to test the hold before you move on.
The thread shank is the single most important part of sewing on a coat button. Without it, the button pulls flat against the fabric, which puts enormous stress on the stitches every time the coat is fastened.
Shank buttons: a slightly different approach
Shank buttons have a small loop or protrusion on their back rather than holes through the face of the button. They’re common on heavier coats and outerwear. Because the shank is built into the button itself, you don’t need to create one with thread — but the stitching method changes.
Thread your needle as before. Bring the needle up through the fabric from the back, pass it through the shank loop, and return it back through the fabric. Repeat this eight to ten times, then secure with locking stitches on the reverse side. The key here is making sure the button sits upright and doesn’t tilt — adjust the position as you stitch if needed.
Common mistakes that lead to buttons coming loose again
| Mistake | Why it’s a problem | How to avoid it |
|---|---|---|
| Using regular sewing thread | Too thin and breaks under coat fabric weight | Use button thread or doubled heavy thread |
| Skipping the thread shank | Button pulls flat and stitches fail quickly | Always build a shank on flat buttons |
| Too few stitches | Not enough thread to handle daily stress | Minimum 6–8 passes per pair of holes |
| Not securing the end thread | The whole repair can unravel | Always finish with locking stitches on reverse |
| Leaving old thread in place | Weakens anchor point | Remove all old thread before starting |
When a quick fix isn’t enough
Sometimes the problem isn’t just a loose button — it’s the fabric itself. If the fabric around the original button position is torn, stretched, or fraying, simply re-sewing the button in the same spot won’t hold. In these cases, you have a few options.
- Sew a small square of interfacing or a piece of sturdy fabric to the back of the coat at the attachment point before re-sewing the button. This reinforces the base.
- Move the button slightly — even a centimeter — to a spot where the fabric is still intact.
- If the damage is significant, this is a job for a tailor, especially on an expensive coat.
Coat fabric, particularly wool and wool blends, can be unforgiving once it tears near a button. Acting on a loose button before it reaches that stage is always the better call.
Making sure it holds — for good this h2>
Once you’ve re-attached the button, there are a few habits that genuinely extend how long your repair lasts. Pull buttons through their holes using the button itself rather than tugging the coat fabric. This sounds obvious, but most people do the opposite out of habit. Also, avoid over-fastening — if a button feels like it’s pulling hard to reach its hole, the coat may need a button moved rather than forced.
If you want extra security on a button you use every day, a small drop of clear fabric glue applied to the knot on the back of the fabric (not to the button itself) can act as an additional anchor. It doesn’t replace proper stitching, but it does prevent the knot from slipping undone over time.
Checking your coat buttons at the start of each cold season takes about thirty seconds and tells you which ones are beginning to loosen before they become an actual problem. Catching a button when it’s just slightly wobbly is far easier than tracking it down after it’s fallen off on a crowded street.